WW2 British Tanks in Over 100 Images

Jesse Beckett

In the interwar period between WWI and WW2, the British had developed their tank doctrine that would be used in future combat. This involved three main classes of tanks: infantry, light and cruiser.

Light tanks were small, mobile very thinly armored and armed, and would scout ahead of the main force, locating and identifying enemy forces and positions. Infantry tanks were heavily armored, capable of withstanding heavy direct enemy fire. They would advance at walking pace with the infantry, providing cover and destroying dug in targets. Cruiser tanks carried enough armor to protect the crew against light incoming fire, had good mobility and adequet guns. The cruisers would rush and exploit holes made in the enemy lines by infantry tanks.

Below are some of the vehicles included in this doctrine.

Vickers Medium Tank Mark 2

The Vickers Medium Mark 2 was Britain’s primary tank in the post WWI era, and was based on designs from that time. The tank had multiple firing ports in the hull, in which a Vickers machine gun could be mounted. It was powered by an 80 hp Armstrong Siddeley V8, and had a rather poor top speed of 13 mph. Armor was at maximum 8 mm thick.

It was still in use in 1939, but was severely out of date. Due to this the Vickers Medium Mark 2 was mainly used as training vehicles.

Vickers Medium Mk II tank


Front view of the Vickers Medium Mk II tank of the Royal Tank Regiment at Farnborough, 1940.


Side view of a Vickers Mark 2 Medium tank on manoeuvres. This tank weighs fifteen tons and is armed with a 47mm main gun and three .303 machine guns.


Vickers Medium Mark II at the Bovington Tank Museum.Photo DAVID HOLT CC BY-SA 2.0


Vickers Medium Mk II tank of the Royal Tank Regiment at Farnborough, 1940.


Vickers Medium Mk II tank of the Royal Tank Regiment on manoeuvres at Bovington Camp, Dorset, November 1939.

Vickers Light Tank Mark 6

The Vickers Mark 6 was the last in a line of light tanks designed by Vickers, and was produced between 1936 and 1940, with a total of 1,680 being built. As a light tank, it was thinly armored, at maximum 14 mm, but was very mobile. It was armed only with machine guns. Its 88 hp Meadows 6 cylinder engine allowed to drive at 35 mph.

They were used in the Battle of France in 1940, where it was found that they were incredibly vulnerable, and not suited to conventional tank warfare.

Light Tank Mk.VI chassis with a German 10.5 cm leFH 16 howitzer mounted


Light Tank Mk.VIA of the 3rd King’s Own Hussars.


Vickers Light Tank Mk VIC knocked out during an engagement on 27 May 1940 in the Somme sector.


Vickers light tanks cross the desert, 1940


A Mk VI undergoing maintenance, France 1940. The location of the engine, beside the driver, can be seen


Light Tank Mk VIB
Light Tank Mk VIB

Matilda I & II

The Matilda series of tanks were infantry tanks, expected to receive large amounts of incoming fire and survive. They were slow, but very heavily armored. The earlier Matilda I was very small, only big enough to fit in two crew. On top of this it was incredibly slow, with a top off road speed of just 5.6 mph. However, it was protected by up to 60 mm of armor, a huge amount of a 1930s design. This armor allowed it to survive where many others couldn’t in the Battle of France, but its machine gun armament made it quite literally useless against anything armored, meaning it was outdated as soon as it arrived.

The Matilda II was designed to bring more firepower than the Matilda I. It was very well armored, with a 80 mm on the front. This made them incredibly hard to knock out during the Battle of France, with only the German 88 mm guns able to reliably penetrate. Its 2 pdr gun was adequate in 1940, but became rapidly out dated. The Matilda II was the only British tank to serve during WW2 from start to finish.  .

A Matilda Frog being demonstrated on Morotai, June 1945


An Australian, howitzer-equipped Matilda of the 2 9th Armoured Regiment in combat at the Battle of Tarakan (May 1945)


Matilda Baron under test


Matilda I tanks in the Bovington Tank Museum.Photo Jonathan Cardy CC BY-SA 3.0


Matilda II.A Matilda’s crew display a captured Italian flag as they enter Tobruk, January 1941


Matilda Scorpion in North Africa, 1942

Tank, Infantry, Mk I, Matilda I (A11)


The driver of a Matilda I in France during the winter of 1939–40. This shows the cramped driver’s compartment and how the hatch obstructs the gun turret.


A Matilda advancing through Egypt as part of Operation Compass.

Valentine

The Valentine was designed by Vickers-Armstrong as an alternative to the Matilda. Despite not being entirely satisfied with the design, the British War Office approved the design due to the impending war in Europe. Its low silhouette meant it was cramped and uncomfortable, but its good armor and reliability meant crews liked it.

A series of weapons upgrades kept it relevant through much of the war, but by 1944 it had become obsolete.

Valentine with AMRA
Valentine with AMRA


Valentines bound for the Soviet Union being loaded on C.P.R. flat cars


A Valentine in North Africa, carrying infantry from a Scottish regiment.


A Valentine tank which was captured by the Germans in 1942 and used by them until it was knocked out, February 1943


Crew inside a Valentine tank loading the 2-pounder gun


Flame mortar fitted to Valentine tank chassis, firing phosphorus bombs


Infantry tank Valentine II in Kubinka tank museum, Russia. Photo Saiga20K CC BY-SA 3.0


The first tank to be manufactured in Canada, a Valentine VI, being inspected by C D Howe the Canadian Minister of Munitions and Supply in May 1941


The Valentine IX. This was armed with the QF 6-Pounder gun with many of these being sent to Russia under Lend Lease


The Valentine XI. Armed with the 75 mm gun


Valentine DD tank with screen lowered, 1944


Valentine flame-thrower (cordite-operated equipment)


Valentine flame-thrower (gas-operated equipment)


Valentine II
Valentine II


Valentine III. Note the different turret.


Valentine Scorpion
Valentine Scorpion

Churchill

Like the Matilda and Valentine, the Churchill was another infantry tank, and has since become a symbol of British forces in WW2.  It was initially built to carry only a 2-pounder gun in its turret and a 3-pounder howitzer in the front of the hull. This weaponry was steadily upgraded throughout the war,

First used in the disastrous Dieppe Raid of 1942, the Churchill served successfully in other theatres, including on the Eastern Front, and provided the basis for many specialist armored vehicles.

A postwar Churchill Kangaroo viewed from the left rear


A Soviet Churchill Mk IV passes a knocked-out German Sd.Kfz 232 (8-Rad) armoured car at the fourth battle of Kharkov in 1943


AVRE 290mm Petard Mortar and its ammunition (projectile standing on its flat nose, with tail facing up, at right)


Churchill Ark Mk II (UK Pattern)


Churchill ARV Mk II with front jib erected


Churchill AVRE with fascine on tilt-forward cradle. This particular example is a post-WW2 AVRE on the MK VII chassis.


Churchill Crocodile
Churchill Crocodile


Churchill Mark III tanks of ‘Kingforce’ during the 2nd Battle of El Alamein


Churchill Mark III
Churchill Mark III


Churchill Mark VI
Churchill Mark VI


Churchill Mark VII
Churchill Mark VII


Churchill Mark VIII with 95mm howitzer


Churchill tanks of 9th Royal Tank Regiment during an exercise at Tilshead on Salisbury Plain, 31 January 1942


North Irish Horse Churchill advancing towards Florence, Italy. 23 July 1944.


Tank, Infantry, Mk IV (A22)


A Churchill bridgelayer of 51st Royal Tank Regiment in action during a demonstration in the Mezzano area, 30 March 1945.


A Churchill tank of the North Irish Horse crossing the Senio in Italy on two stacked Churchill ARKs, April 1945


Churchill Gun Carrier in Dorset, 25 March 1943

Cruiser Mark 4

The Cruiser Mark 4 was, unsurprisingly, a cruiser tank. Relatively light, it was designed to exploit gaps in enemy lines attack from the rear. Its Christie suspension and 340 hp engine gave it a good top speed of 30 mph.

The Mark 4 fought in France and the Western Desert. But the idea of flanking cruisers did not match the reality of war, and its 2-pounder gun was underpowered for modern tank fighting.

A Cruiser Mk IV tank destroyed in the North African Campaign.


An A13 Cruiser Mk IV and a Matilda tank at a depot in Egypt, 5 September 1941.


Cruiser Mk IV tank knocked out during an engagement on 30 May 1940


Cruiser Mk IV tanks of 5th Royal Tank Regiment, 3rd Armoured Brigade, 1st Armoured Division, drive through a Surrey village, July 1940.


Cruiser Mk IV tanks of 5th Royal Tank Regiment, 3rd Armoured Brigade, 1st Armoured Division.


Cruiser Mk IV tanks
Cruiser Mk IV tanks


Cruiser Mk IVA tanks on exercise, 1st Armoured Division, 20 April 1941.


Cruiser-MkIV
Cruiser-MkIV


Tank, Cruiser, Mk IV (A13 Mk II)

Crusader

The last British cruiser designed between WWI and WW2, the Crusader was a tank built in large numbers, and proved very useful in the early years of the war. Its 2 pdr gun was underpowered, and would eventually be replaced by a much more capable 6 pdr. With this gun Crusaders formed the backbone of early war British tank forces.

They were replaced later in 1942 when the Americans supplied the British with Grant and Sherman tanks.


Crusader I tanks in Western Desert, 26 November 1941, with “old” gun mantlets and auxiliary Besa MG turret.


Crusader I with its auxiliary turret in place


Crusader II, and Covenanter at rear, training in Yorkshire, 1942


Crusader III before Alamein, with ‘Sunshade’ camouflage


Crusader Mk III tanks in Tunisia, 31 December 1942.


Crusader Mk III
Crusader Mk III


Cleaning the barrel of the 6-pdr in Tunisia


Crusader AA tank variant mounting a triple Oerlikon gun in a hull-down position, 19 July 1944


Crusader AA with 40 mm Bofors gun, at the Armoured Fighting Vehicle School, Gunnery Wing at Lulworth in Dorset, 25 March 1943

Covenanter

Another rush job, the Covenanter had well angled deflective armor but its tracks were too narrow and its engine cooling defective. Over a thousand were made, but it was never used in battle.

Tank, Cruiser, Mk V, Covenanter (A13 Mk III)


A pilot model. The radiator covers are at the left front. Note also the Valentine-type gun mantlet. Most production Covenanters had a different type of mantlet


Covenanter bridgelayer with vehicle-launched span


Covenanters of the 2nd (Armoured) Irish Guards, Guards Armoured Division, during an inspection (3 March 1942)

Cromwell & Centaur

The Cromwell was perhaps one of the most important British tanks of WW2. It was meant to replace the Crusader, but issues with the design and sourcing engines meant its arrival to the front lines was delayed until 1944. Powering the Cromwell was the 550 hp Rolls-Royce Meteor V12, an engine that finally gave the British a decently protected tank that still retained good mobility.

It had an impressive top speed of 40 mph, a speed that could quickly get the crews into trouble.

The Cromwell laid the groundwork for future British designed, including the Centurion, one of the most successful tanks ever made.


Wounded German soldiers being ferried to an aid post on the hull of a Cromwell tank


A Cromwell IV of the Welsh Guards displays its speed at Pickering in Yorkshire, 31 March 1944


A King’s Royal Hussars Cromwell of the 11th armoured division advances through Uedem, Germany, 28 February 1945


Centaur Dozer with hydraulic operated blade


Centaur IV of Royal Marine Armoured Support Group, Normandy 13 June 1944


Cromwell VI with type F hull, showing driver’s side-opening hatch and turret storage bins


Cromwell VIIw with type Dw or Ew hull, showing welded construction with applique armour


Czechoslovak soldiers on a Cromwell tank near Dunkirk in 1945.

Challenger

Despite the Cromwell’s good armor and mobility, it still lacked a gun capable of dealing later German tanks. The British wanted to mount the 17 pdr anti-tank on the Cromwell’s chassis, but limitations in the design prevented this. To solve this problem, the Birmingham Carriage & Wagon Company created the Challenger, a significantly modified Cromwell chassis that could carry the 17 pdr.

The turret had to be higher to house the weapon and the chassis was lengthened to accommodate this, with the extra weight impeding performance. The more numerous and easier to modify Sherman could carry the 17 pdr aswell, as the Firefly, which made the Challenger a redundant design. As a result, only 200 were buit.
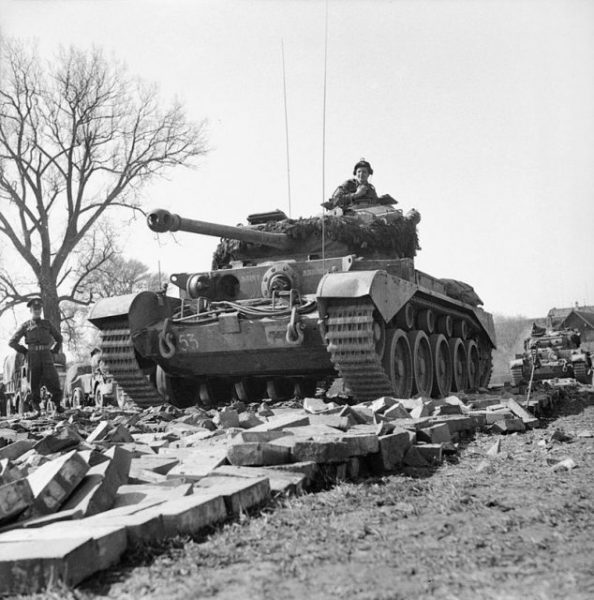
Cruiser tank Challenger (A30)


Tank, Cruiser, Challenger (A30)


A Challenger tank crosses a Bailey bridge near Esch, Netherlands. 27 October 1944

Comet

The Comet was a more thorough attempt at up-gunning and improving the Cromwell. The Comet was equipped with a 76.2 mm 17 pdr HV high velocity gun, a gun that could knock out both the Tiger and Panther up to medium ranges. It retained the Cromwells good mobility, with an improved turret and armor. The Comet didn’t arrive until the closing stages of the war, but was very popular with crews as it was mobile, reliable comfortable to operate, and could tackle heavy German tanks. It would remain in service with the British until 1958.

Comet tanks of the 2nd Fife and Forfar Yeomanry, 11th Armoured Division, crossing the Weser at Petershagen, Germany, 7 April 1945


A Comet’s crew loading 77 mm HV ammunition into their tank.

Firefly

An American Sherman tank upgraded with a British 17-pounder gun, the Firefly was developed to help Allied tankers take on German Tigers and Panthers.

Used by both British and American forces in the invasion of Europe, it was so effective that it became a prime target for the Germans, so camouflage paint was used to disguise its long barrel.

Firefly tanks of the South African Pretoria Regiment, Italy 1944


Loading 17-pounder rounds into a Firefly


Sherman Fireflies with “60 lb” air-to-ground rockets on rails attached to the turret


Sherman Firefly during the Battle of the Bulge, 1944


A Sherman Firefly crosses ‘Euston Bridge’ over the Orne as it moves up to the start line for Operation Goodwood, 18 July 1944


A Sherman Firefly of 7th Armoured Division in Hamburg, 4 May 1945


Firefly of 5th Canadian Armoured Division assists troops of 49th (West Riding) Division to clear the Germans from Ede, Netherlands, 17 April 1945

Tetrarch

Light enough to be transported by air, the Tetrarch was carried into action by a Hamilcar glider. It was used in the invasion of Madagascar in 1942 and Normandy in 1944, giving airborne troops valuable armored support

Side and rear view of a Tetrarch light tank


Tetrarch with Littlejohn (or Janeček) adaptor


General Sir Alan Brooke, Commander-in-Chief Home Forces, inspecting a Light Tank Mk VII (Tetrarch) at the Army Staff College, 1941

Another Article From Us: The Panzer 35(t) in 20 Photos

Mk VII Light Tank ‘Tetrarch’

jesse-beckett

jesse-beckett is one of the authors writing for Tank Roar